Create a New Layer:
The next step is create a new layer (see image). The reason for creating a new layer is so we can use it for the color level. Have this new layer set at “Multiply”, in order to see your line drawing underneath. It would be a good idea to name this new layer. Give it a name you can easily recognize, like “color” or “tones”. There are many ways that you can color your image. Some people just end up flooding the entire layer with one color and then systematically replace certain colors. You can do it that way. However, the way I did it for this demonstration is somewhat different. Since I already have a specific color that I am going to use, flooding the entire page with one color wont work in this case.
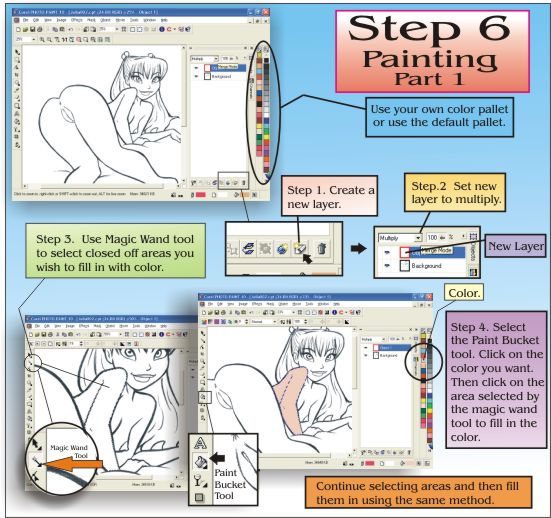
Using the Magic Wand:
I paint using the magic wand tool. I just click on a closed area and it selects just that specific area. This is great when you need to airbrush some tones in that area only. It is also helpful when you click on an area and it selects something else that you didn't want, because then you know that you have a leak somewhere in your line drawing. It is better to fix it now than to try and paint it. For this demonstration, I have selected Julia’s left arm and part of her back. Keep in mind that I am still working in the color layer.
Using the Paint Bucket:
The Paint Bucket tool is pretty straightforward. Choose the paint bucket tool, pick the color you wish to fill with and click in the selected area. Make sure you masked off the area you want to fill in with the Magic Wand tool. The color should fill the whole area that has been selected. Do the same with all the other areas you wish to color. The color will only be filled in the masked area. You must select other areas with the Magic Wand tool in order to paint them. Alternate between your Magic Wand tool and your Paint Bucket tool as you go through your entire drawing. Corel has made this part easy by having the spacebar act as a switch. Pressing your spacebar will take you back to the last tool you used and vice versa. Suffice it to say that this part is easy. The hard part comes later.
Using the Brush Tool:
A. Filling in the remaining color
This part becomes a little harder because you will be focusing on details. Sometimes the paint bucket tool does not fill in all the nooks and crannys, leaving behind unfilled areas near your line. This happens because your line either is of low quality or you’ve scanned at a low resolution leaving your line somewhat pixelized. Do not worry yourself. All you need is the paint brush tool and a steady hand. I always use the mouse, even when I’m painting, so I’ve managed to control the mouse fairly well. Some of you may use a board with a pen, that’s fine also. However, you must learn to keep you hand steady for this proceedure. That means no masturbating while doing this! Set your brush tool to a sharp edge and 0% tolerance. This means that the brush will paint with full opaqueacy. Make sure you are not using a soft edge. What you want to do here is just fill in the flat color that remains to be filled.
B. A talk about techniques
Before you begin painting in the color, notice the gray around some of your lines. This means that some of the color did not fill in underneath that line. If you recall earlier that I mentioned that some people just flood the entire page with one color and then replace those colors. Well this tecnique usually takes care of that problem. My tecnique however has created this problem. I use to tear my hair out before trying to figure out how to deal with this problem. Now I can say that I have somewhat fixed this dilema. Of course, nothing beats a drawing that has been inked by a real inker. An inked drawing once scanned leaves a sharp image in which all you have to do is fill in the color. I am not an inker and I find it really hard to do. So I pencil in my drawings which add to this problem of unfilled pixels.

C. Filling in the remaining color (continued)
Again I remind you that your hand must be steady. Lay off the coffee and the soda. Select your color, usually the color that you have already used for that area. Remember, you are just filling in color. Hit all the edges with your brush. On internal lines, like Julia’s arm, you can paint right over the line. Make sure you are still in the color level. If for some reason you accidently switched over to the line level, you would have effectively replace your line with a brush stroke. You don’t want that. You want to keep your line. This is the whole purpose of working on an entirely different level.
D. A talk about tutorials
I used to work on one level (Boy was I stupid). This limited me tremendously. If you ever take a look at my earlier stuff you will notice some blue mixed in with my line. That’s before I found that you can work on different levels and still be able to see your original line underneath all that paint. This was like a revelation to me. I don’t claim to know all the techniques and I seriously don’t know all the techniques. That’s why I would recomened you serious artist out there to comb the internet for professional tutorials. I’ve been really disappointed with the bookstores for they seem to lack anything resembling a tutorial like this. I have found some good tutorials that have come out of Japan. I wish I could read Japaneesse because they do some really nice CG work. I have learned some stuff from just looking at the pictures. Other tutorials that I would recommend are at https://pub127.ezboard.com/bcartoonandillustrationparadise66133 They are really good and seem to know their stuff.
E. Filling in the remaining color (continued)
Hopefully you understand what I am trying to convey to you. Don’t worry about tones at this point. You are only concerning yourself with filling in all the flat color. If you switch off the line level you will see where you need to fill in your color. However, always work with the line level on or visable. I do this so I can know where I can bring my color up to. Do this until all your gray is gone. The result will be your line underneath showing through the color on top.
 Jab
Jab